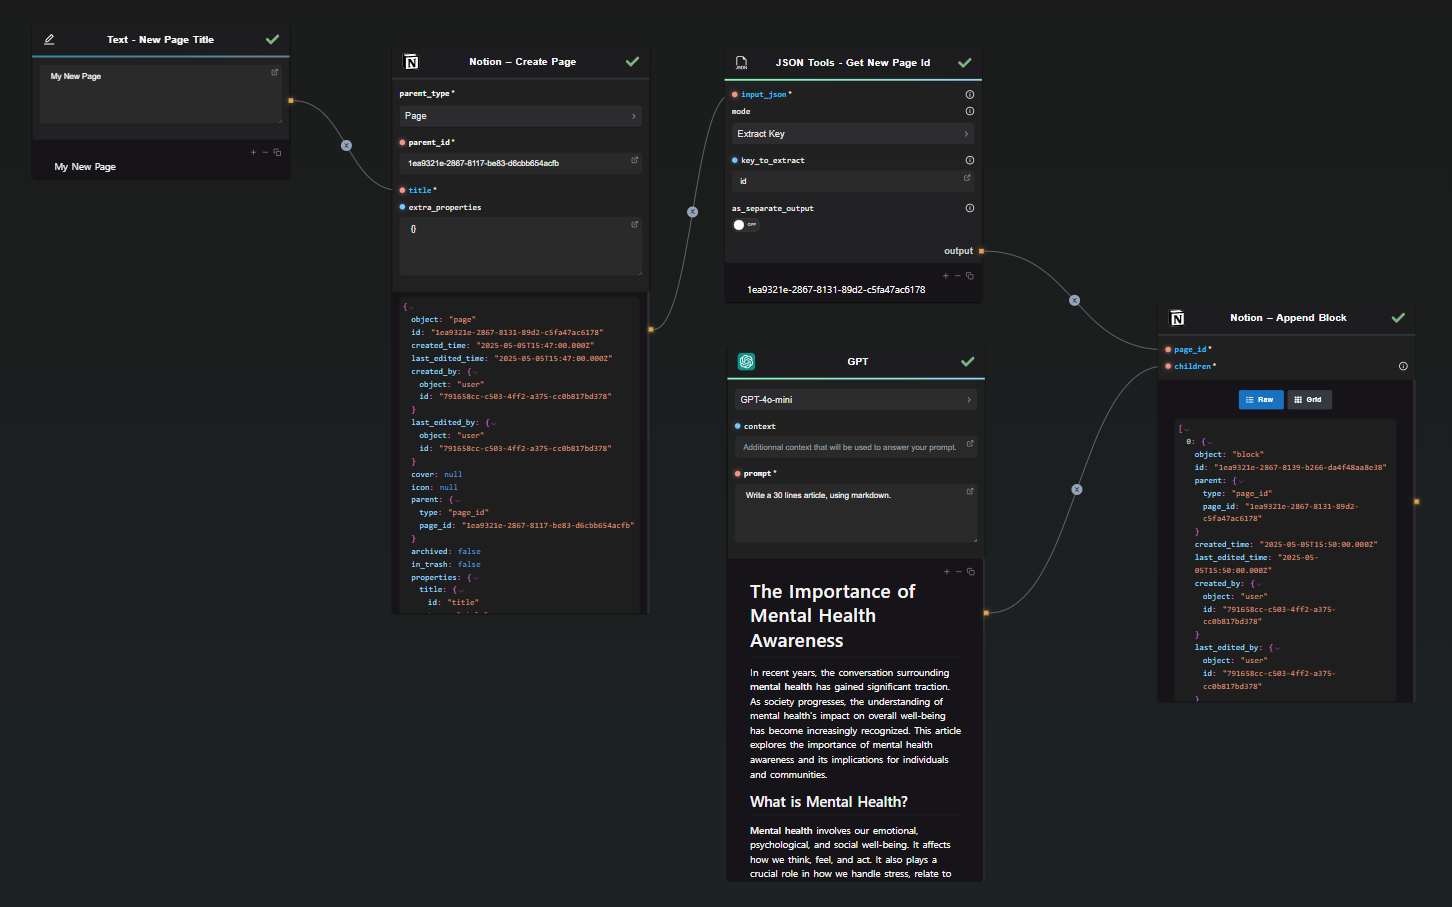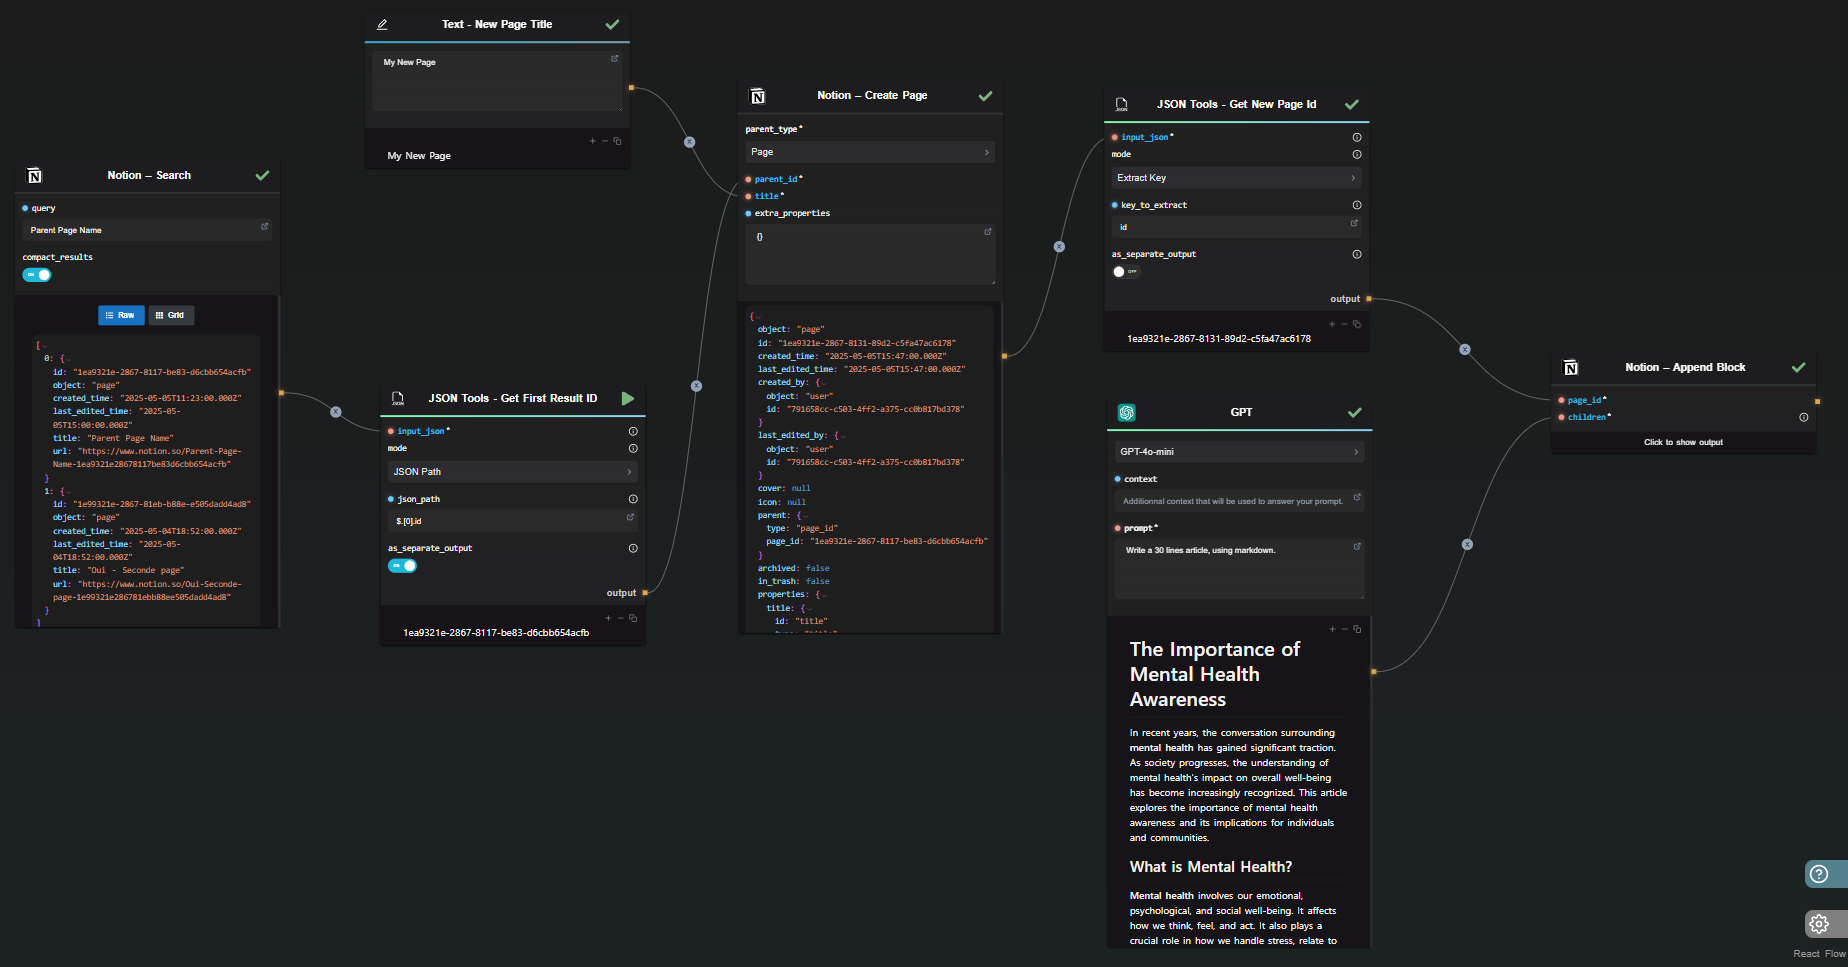
3 posts tagged with "Workflow Automation"

View All Tags

· 4 min read
DahnM20

Simplify OCR Tasks with AI-Flow: Transform Images and Scanned Documents into Usable Text

Efficiently extracting text from images and scanned documents is essential in today’s digital world. Whether for data analysis, archiving, or improving accessibility, transforming visual information into text saves both time and effort. AI-Flow's OCR (Optical Character Recognition) template offers a streamlined solution, providing multiple automated paths to get the best results quickly and accurately.

The AI-Flow Advantage: Transforming Images into Text

AI-Flow provides a structured, user-friendly approach to OCR, offering various methods for text extraction. In this article, we’ll introduce three ways AI-Flow can enhance your workflow, allowing you to select the most suitable approach based on your document type and end goals.

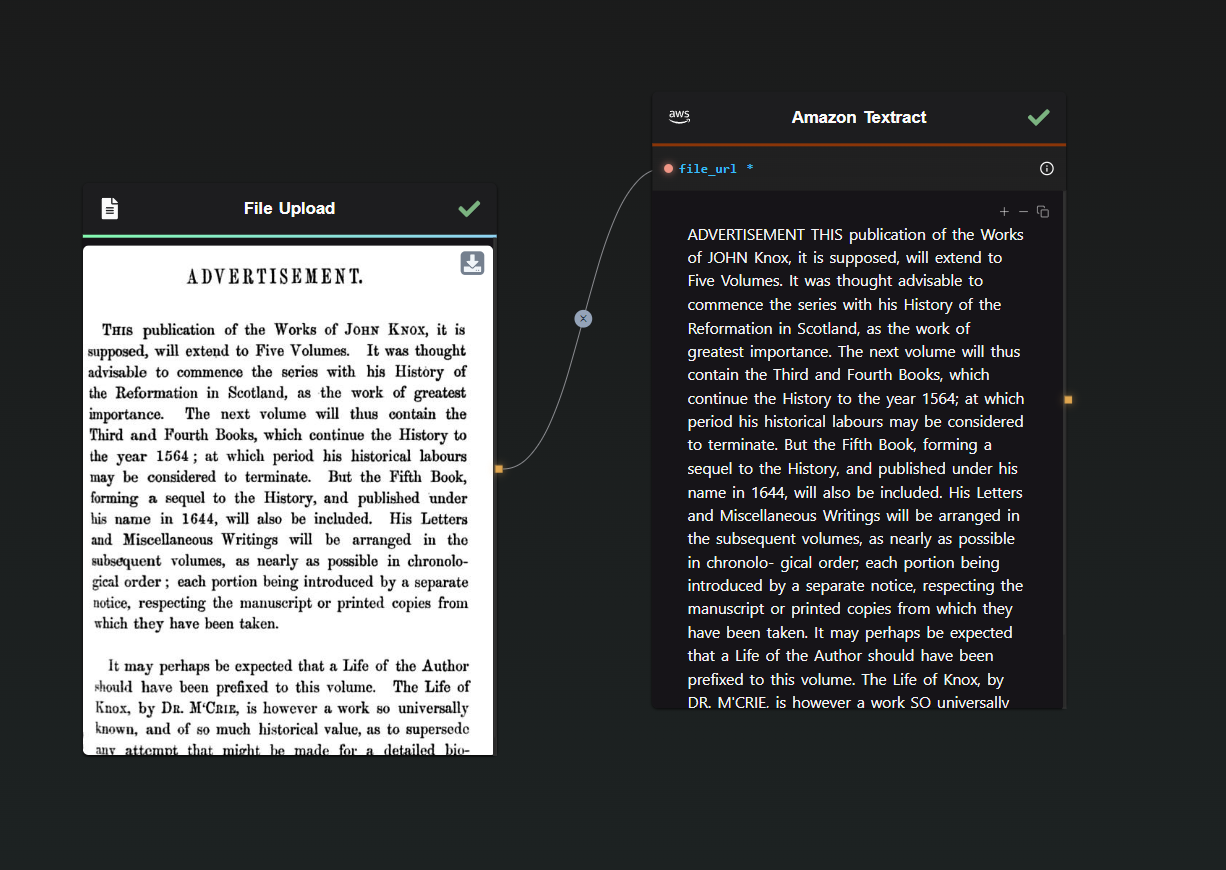
1. Streamlining Text Extraction with Amazon Textract Integration

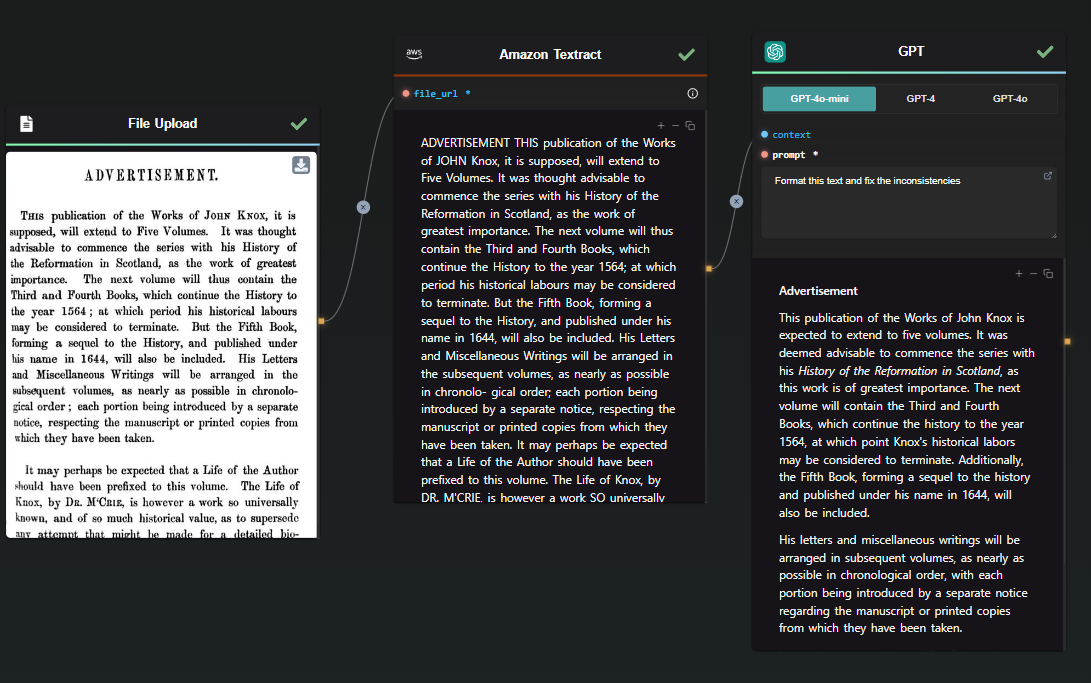
Amazon Textract is known for its robust performance in extracting text from complex documents, such as forms and invoices. By integrating Amazon Textract into AI-Flow, you can automatically process large volumes of documents with high efficiency. Compared to other methods, Amazon Textract is faster and more cost-effective.

OCR Workflow with Amazon Textract

2. GPT 4o Vision Mode

For situations where context and deeper understanding are essential, GPT Vision Mode is a valuable tool. This method not only extracts text but also adds an interpretive layer, making it ideal for tasks that require nuanced understanding or additional processing, such as summarization. For instance, GPT Vision excels at extracting text from comics or manga panels, where traditional OCR tools like Amazon Textract may struggle with layout complexities.

Studies about the previous GPT-4 Vision model have shown that while GPT-4 Vision performs well for Latin characters (e.g., English, French, German), it struggles significantly with non-Latin scripts like Chinese, Korean, and Japanese. Additionally, GPT-4 Vision adapts to varying image resolutions, potentially capturing more intricate details than some traditional OCR models. However, it may have a higher "refusal rate," where it produces unusable results, a problem not typically found with traditional OCR models​.

Source : Exploring OCR Capabilities of GPT-4V(ision) : A Quantitative and In-depth Evaluation

OCR Workflow with GPT

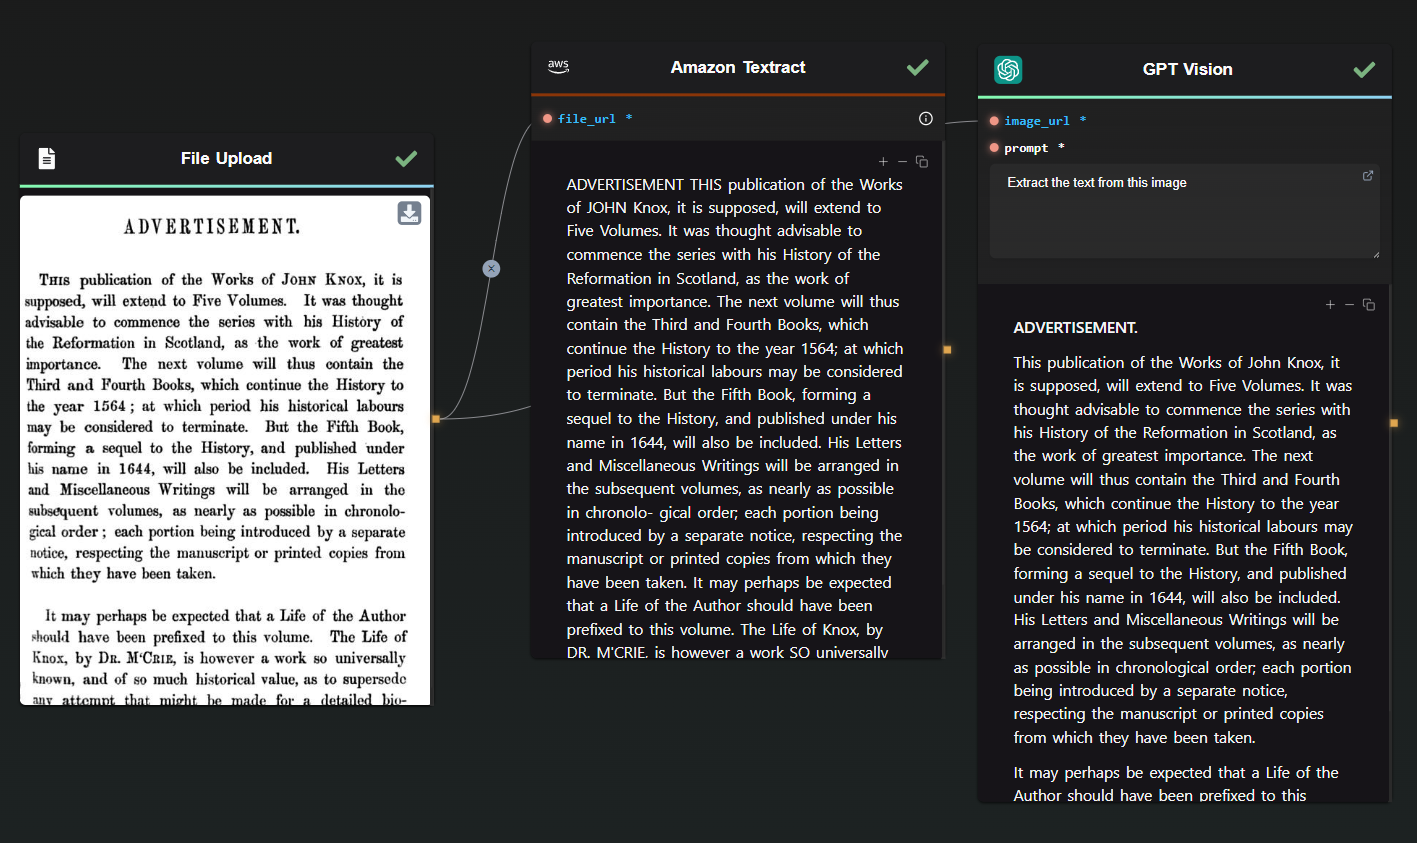
3. Combined Approach: Textract and GPT Vision

When accuracy is paramount, combining Amazon Textract with GPT Vision ensures precision by addressing discrepancies and inconsistencies. This hybrid approach allows for different strategies, such as using GPT to correct Textract’s results or leveraging both the extracted text and the image as prompts for GPT Vision. This method is particularly useful in applications where data accuracy is crucial.

Combined OCR Workflow

Customization and Enhancement with AI-Flow

AI-Flow's intuitive drag-and-drop interface makes it easy to customize and enhance your OCR workflows. You can integrate additional AI models, automate repetitive tasks, and seamlessly connect outputs to other processes, such as data entry or content management systems.

AI-Flow also supports various AI models, enabling you to experiment and refine your OCR processes to perfectly align with your specific requirements. Whether you're a small business owner or part of a large corporation, AI-Flow adapts effortlessly to meet your unique workflow needs.

Why Choose AI-Flow?

While standalone AI tools like ChatGPT offer impressive text extraction capabilities, the AI-Flow template provides a more structured, automated solution that simplifies the entire process. AI-Flow bridges the gap between multiple AI services, tailoring the experience to your specific document and data processing requirements.

Conclusion

AI-Flow empowers you to automate and enhance your OCR tasks by leveraging advanced AI solutions within a cohesive, user-friendly platform. Its versatile template offers tailored solutions that significantly improve efficiency and accuracy in text extraction projects.

Ready to streamline your OCR processes? Explore the possibilities with AI-Flow today at AI-Flow App. Unlock the full potential of AI-driven workflows and transform the way you handle text extraction from images and scanned documents.


Additional Resources

For more detailed information, refer to the following resources:

· 6 min read
DahnM20

Build and Deploy AI Workflows with AI-Flow

In today's rapidly evolving technological landscape, artificial intelligence (AI) is at the forefront of innovation. However, building custom AI tools often requires integrating multiple AI models or tools, which can be a daunting task, especially for those without extensive coding experience.

AI-Flow is a platform designed to simplify the process of building and deploying AI workflows. With its intuitive drag-and-drop interface, AI-Flow allows users to connect various AI models seamlessly and automate complex tasks with ease. In this article, we'll explore how to build and deploy AI workflows using AI-Flow, highlighting its key features and the API Builder for deployment.

Integrate Multiple AI Models

Getting Started with AI-Flow

What is AI-Flow?

AI-Flow is both a platform and an open-source tool that enables users to create custom AI tools through a simple drag-and-drop interface. It supports a wide range of AI models. Whether you're looking to generate images, summarize content, or automate workflows, AI-Flow provides the tools you need to get started quickly and efficiently.

Key Features of AI-Flow

  • Integrate Multiple AI Models Seamlessly: Combine AI models like GPT-4, Claude, and all the models hosted on Replicate and StabilityAI, among many others, for innovative outcomes.
  • Drag-and-Drop Interface: Create AI tools in minutes without any coding.
  • Customizable AI Solutions: Tailor AI solutions to your specific needs, from SEO content creation to image generation.
  • API Builder: Automate inputs and retrieve outputs via API requests or webhooks, making it easy to integrate AI workflows into your projects.

Building AI Workflows with AI-Flow

Step 1: Creating Your First Workflow

Once you have AI-Flow set up, you can start creating your first workflow:

  1. Open the AI-Flow Interface: Launch the AI-Flow application and navigate to the workflow builder.
  2. Drag and Drop Nodes: Select the AI models you want to use from the available nodes and drag them into the workflow area.
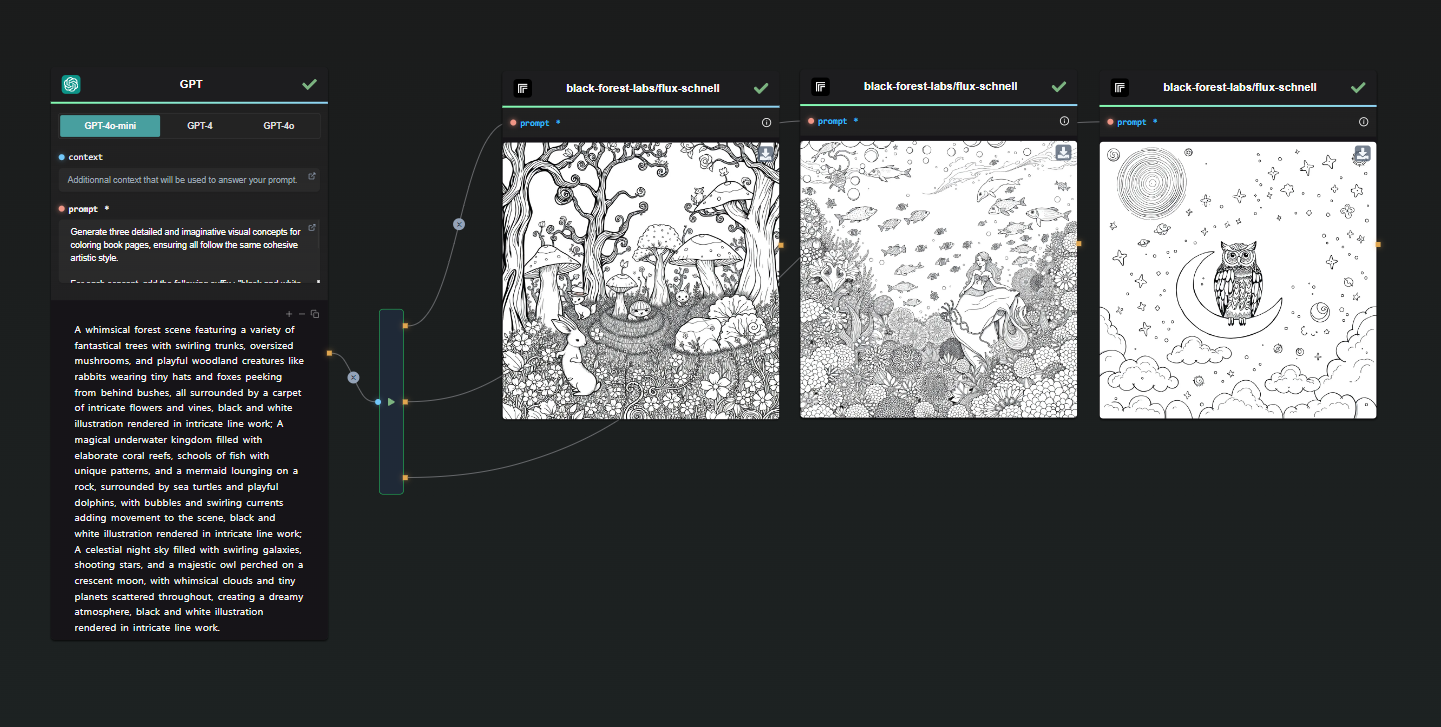
  3. Connect Nodes: Connect the nodes to define the flow of data between them. For example, you can connect a text generation model like GPT-4o to an image generation model like FLUX Pro.
  4. Configure Nodes: Customize the parameters for each node to suit your specific requirements. This might include setting prompts for text generation or specifying styles for image creation.

Step 2: Running Your Workflow

  1. Run the Workflow: Click the "Run" button to execute your workflow within the AI-Flow interface.
  2. Review Outputs: Check the outputs generated by each node to verify that they meet your expectations.
  3. Make Adjustments: If necessary, adjust the parameters or connections between nodes to refine your workflow.

Workflow Output Example

Optional: Start with a Template

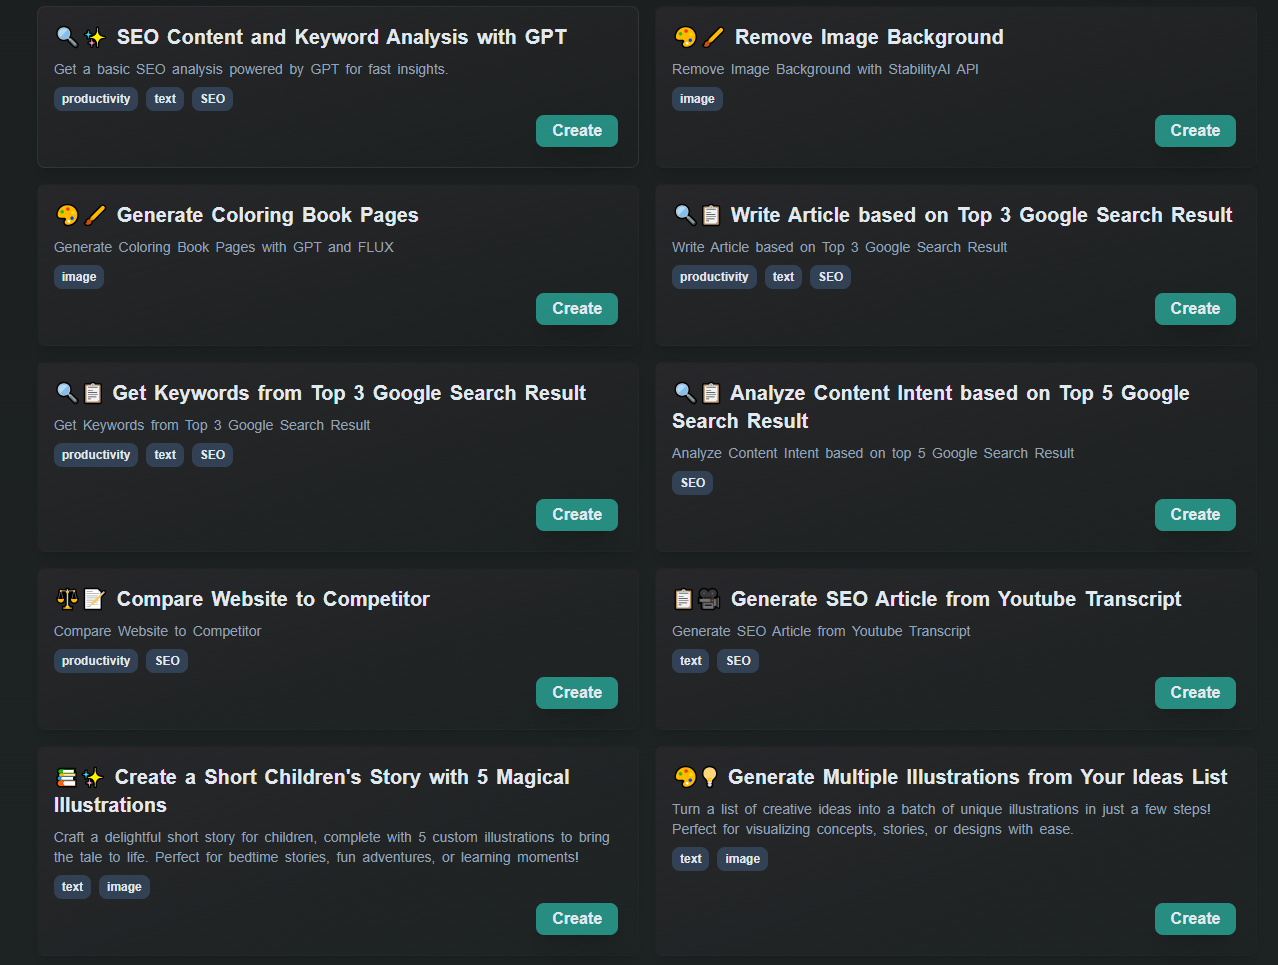
AI-Flow comes with various templates, inspired by user feedback. These templates can be easily customized or used as a way to discover the features of the app.

Start with a template - AI Flow

Deploying AI Workflows with the API Builder

This is an optional feature, designed for those looking to integrate their workflow into an external project.

What is the API Builder?

The API Builder is a powerful feature within AI-Flow that allows you to automate inputs, execute workflows with REST API calls, and handle outputs efficiently with webhooks. This makes it easy to integrate your AI-powered workflows into any project, whether it's a web application, mobile app, or backend service.

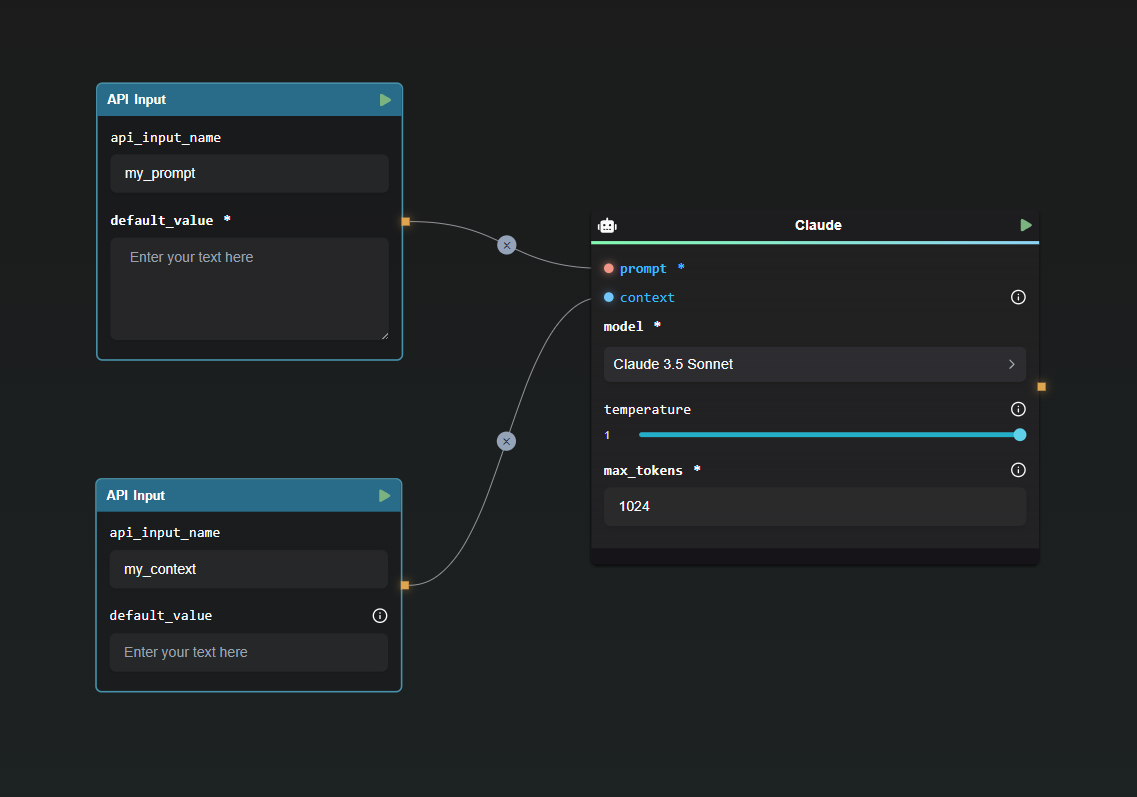
Step 1: Configuring API Input and Output Nodes

To deploy your workflow via the API Builder, you'll need to use the API Input and Output nodes:

  1. API Input Node: Define the inputs for your API by mapping each field in the request body to a corresponding API Input node in your workflow. Set default values for optional parameters.

Webhook Node Example

Example Request Body:

{
"my_prompt": "Lorem Ipsum",
"my_context": "Lorem Ipsum"
}
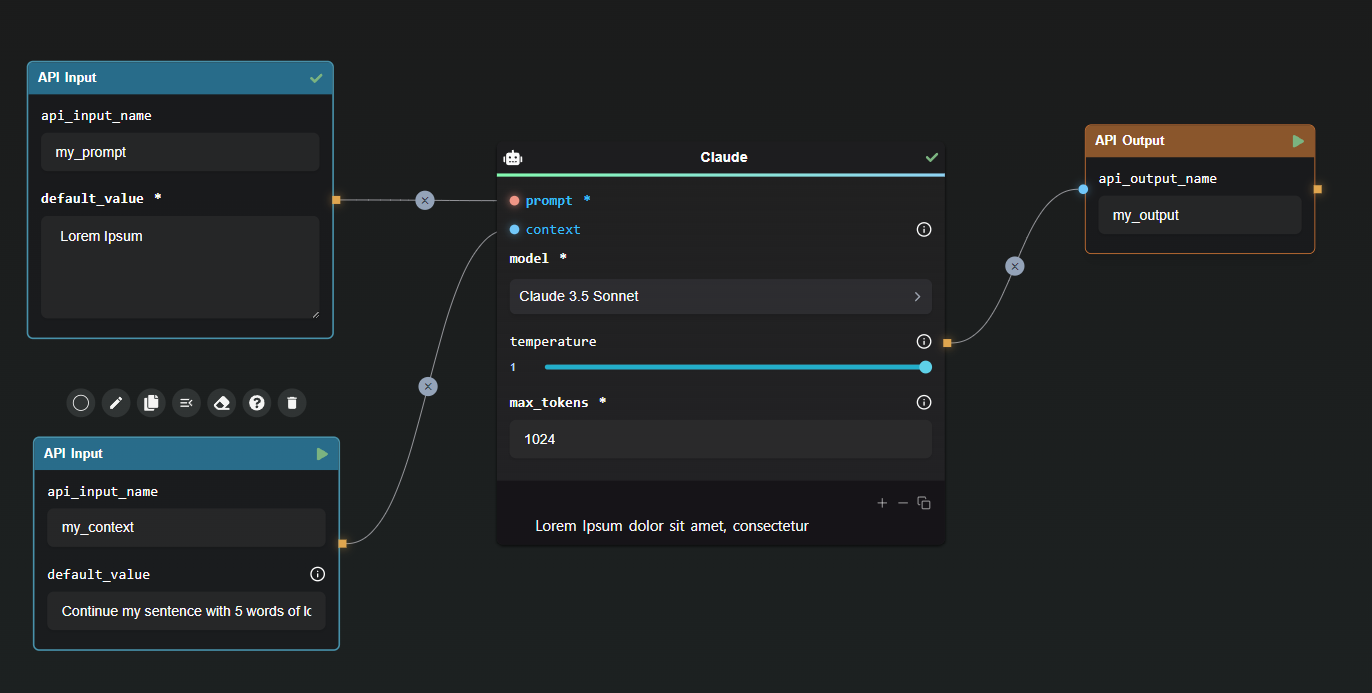
  1. API Output Node: Specify the names of the fields in the final response to ensure the output is structured and understandable.

Webhook Node Example

Example Response:

{
"my_output": "Lorem Ipsum dolor sit amet, consectetur"
}

Step 2: Generating API Keys

To ensure secure access to your workflow, generate API keys within the API Builder. These keys are essential for authorizing requests and are displayed only once for security purposes.

Step 3: Running Your Workflow via API

With your API keys in hand, you can now run your workflow using REST API calls. The API Builder provides code snippets to help you get started. For example, using cURL:

curl https://api.ai-flow.com/v1/flow/<your_flow_id>/run \
-H "Content-Type: application/json" \
-H "Authorization: Bearer $AI_FLOW_API_KEY" \
-d '{
"my_prompt": "Lorem Ipsum",
"my_context": "Continue my sentence with 5 words of lorem ipsum"
}'

This command initiates the flow and returns a run ID to track the process. You can retrieve the results using this ID once the processing is complete.

Step 4: Enhancing Integration with Webhook Nodes

The Webhook Node allows you to send outputs to designated URLs, enabling real-time integration and response handling in your applications. Configure the Webhook Node by specifying the target URL and selecting the outputs to send.

Example Configuration:

{
"my_output": "Lorem Ipsum dolor sit amet, consectetur"
}

This ensures that structured data is sent to the specified URL, facilitating smooth integration and authentication via custom signatures.

Conclusion

AI-Flow simplifies the way we build and deploy AI workflows by offering an intuitive, no-code platform that simplifies the integration of multiple AI models. With its drag-and-drop interface, customizable solutions, and API Builder, AI-Flow empowers users to create and deploy AI-powered workflows effortlessly. Whether you're a beginner or an expert, AI-Flow provides the tools you need to harness the power of AI and drive innovation in your projects.

Start building your AI workflows today with AI-Flow and experience the ease and efficiency of seamless AI integration. For more information and to get started, visit the AI-Flow Application and explore the comprehensive documentation and resources available.


Additional Resources

For more detailed information, refer to the following resources:

· 4 min read
DahnM20

AI-Flow is a tool designed to simplify and automate your AI workflows by connecting various services and tools into a unified flow. This guide will help you get started with AI-Flow, including adding nodes, connecting them, and customizing your workspace for an optimized workflow.

Adding and Connecting Nodes

To build your AI workflow, nodes can be added to the canvas using a simple drag-and-drop interface. Here's a quick overview of how to manage nodes:

  • Handles: In AI-Flow, input and output connections are visualized through handles:
    • Round handles represent input connections.
    • Square handles represent output connections.
  • Handle Color Coding:
    • Blue input are optional.
    • Red input are mandatory and must be connected (or filled) for the node to function.

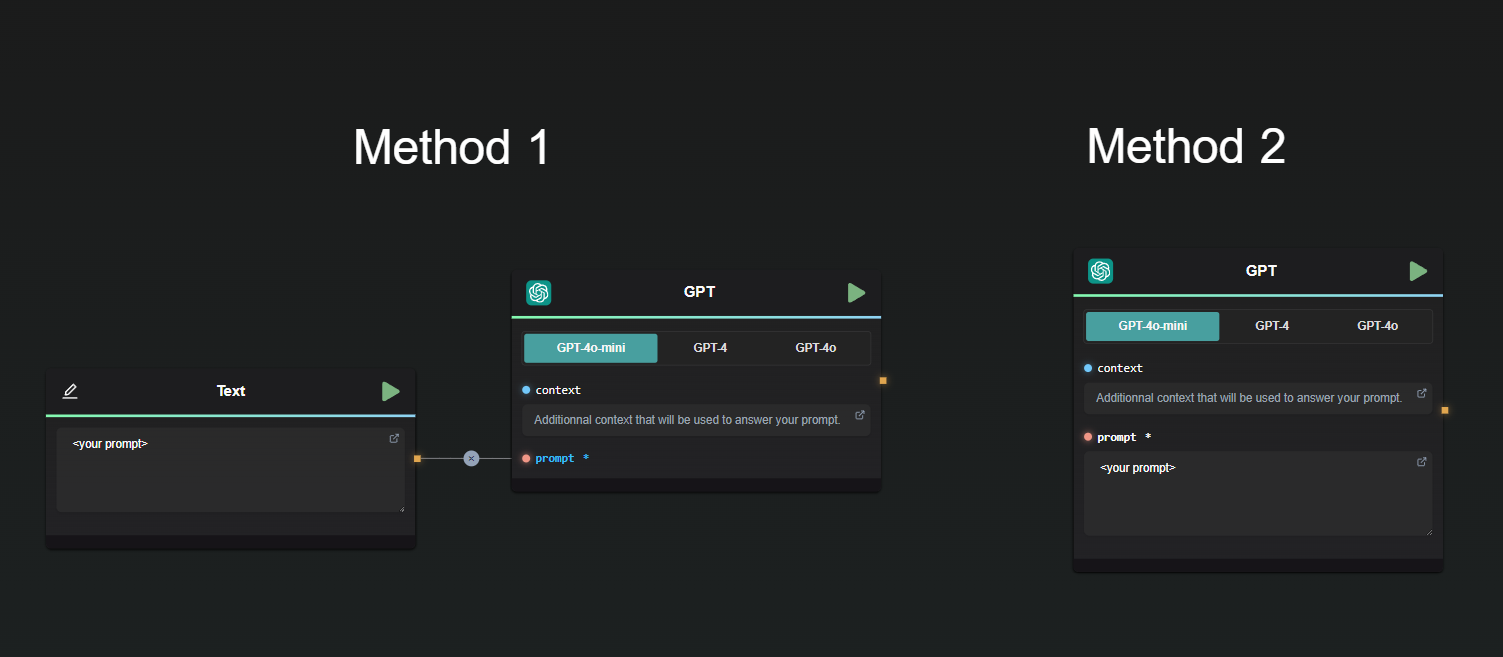
For some nodes, values can either be entered directly into the field or provided through a handle. If a handle is connected to a field, the input field disappears, leaving only the handle.


Example Node connection

Here’s a basic example:

  • Both methods yield the same result.
  • The context field is optional, allowing the node to function without it.
  • The prompt field is mandatory and must be either filled in or connected to another node.

Types of Nodes

AI-Flow offers a wide variety of nodes to suit different needs. Below is a general overview of the node categories:

  • Inputs: Nodes that bring external data into your flow.
  • Models: These nodes connect to AI models provided by services such as OpenAI, StabilityAI, and Replicate.
  • Tools: Nodes designed to manipulate data and structure your workflow.
  • API Builder: These nodes enable your flow to be accessed via API calls. Learn more about this feature in the API Builder documentation.

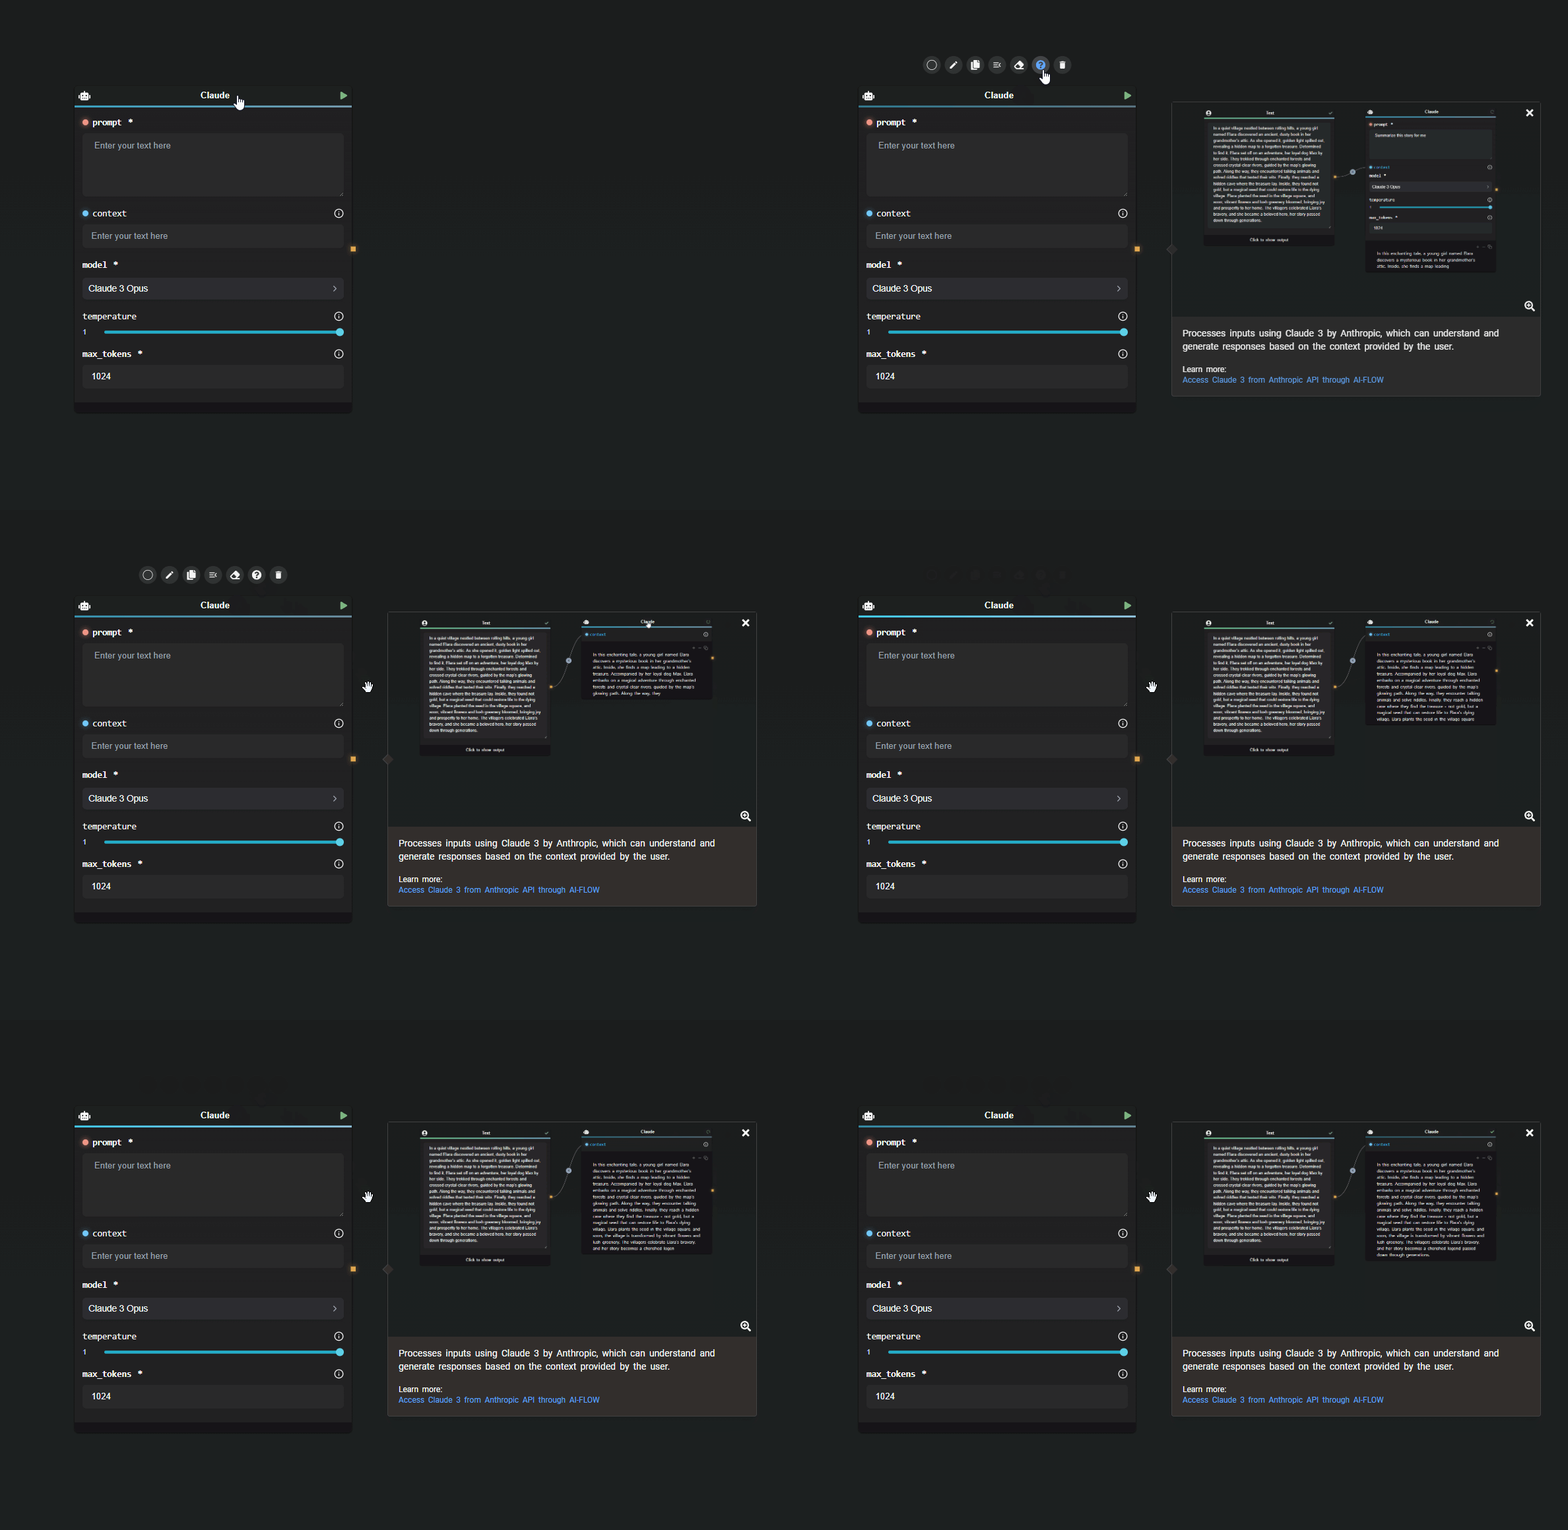
To dive deeper into the functionality of a specific node, use the help action within the node for detailed descriptions, demos, and related resources.

Help Action

File Upload Node

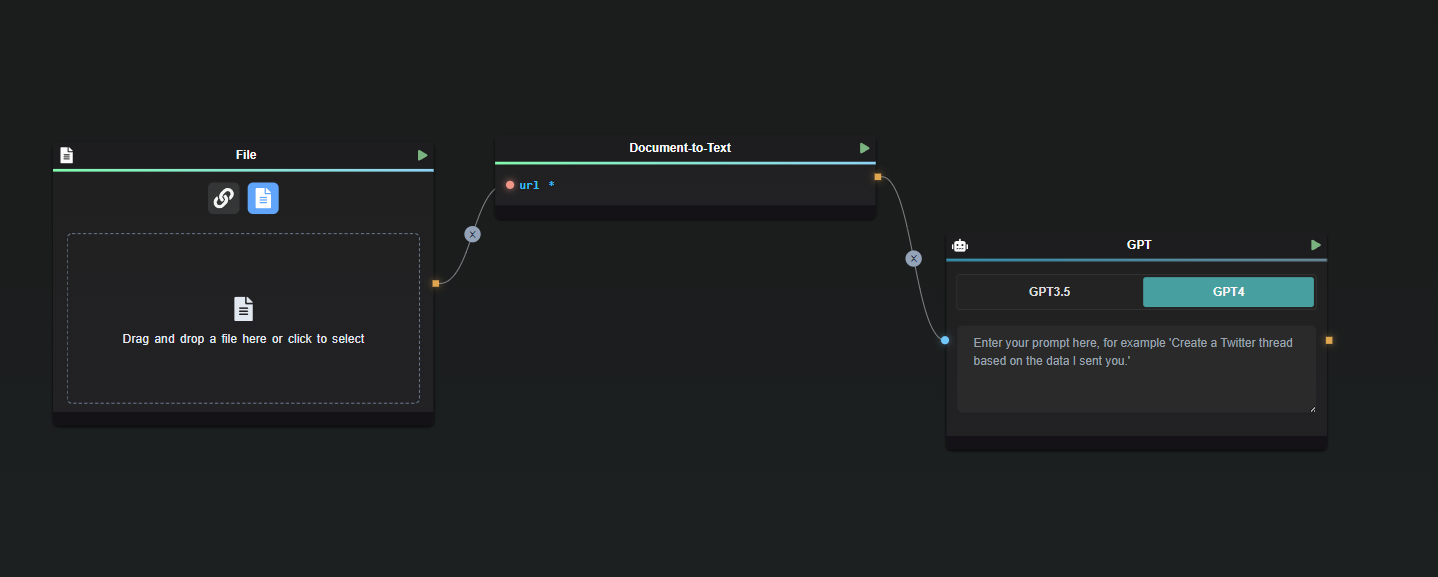
The File Upload node is used to upload a file into the workflow. The node returns a URL that links to the uploaded file.

It's important to note that if you upload a PDF file, the output of the File Upload node will not contain the text content of the PDF itself. To extract the text from the document, follow the upload with a Document-to-Text node, which will process the file and return its text content.

File Upload Node

Opening the Right-Side Pane

Help Action

The right-side pane in AI-Flow provides additional functionality to enhance your workflow management. Here’s what you can do when the pane is open:

  • View Outputs: See a comprehensive list of all outputs generated by the nodes in your flow.
  • Edit Nodes: Directly edit any selected node, even if the node is minimized on the canvas.
  • Disable Auto-Save: Choose to disable the automatic cloud save feature if preferred.
  • Save and Import Flows: You can save your current flow as a .json file for future use or import a previously exported flow.
  • API Management: Manage your API settings and configurations directly from this pane.

This feature is essential for keeping your workflow organized and accessible while providing quick access to critical actions.

Customizing Your Experience

You can tailor the AI-Flow interface to fit your needs:

  • Access the settings to customize which nodes are displayed on the app.
  • The minimap can be toggled on or off to suit your preference.

Note that new nodes may be added over time but may not appear by default. Stay updated with news on the Home page and adjust your display settings to include any newly added nodes that fit your workflow.

Additional Resources

For more detailed information, refer to the following resources: