7 Awesome Ways to Use FLUX.1 Kontext in AI-FLOW
Ready to take your image workflows to the next level? FLUX.1 Kontext is a cutting-edge suite of generative flow-matching models that brings both text-to-image and in-context editing into a single package. Unlike traditional text-to-image systems, FLUX.1 Kontext lets you feed the model existing images plus simple instructions—enabling you to iteratively refine a design or scene without losing quality or consistency. Whether you need ultra-fast batch generations, precise localized edits, or consistent character rendering across multiple frames, FLUX.1 Kontext delivers—all within AI-FLOW’s intuitive drag-and-drop interface.
FLUX.1 Kontext has a major advantage over older instruction-based systems like OpenAI’s GPT Image-1: it’s substantially faster per edit (Pro: ~8–10 seconds, Max: ~10–12 seconds) and in many cases costs less per image (Pro: \$0.04/image, Max: \$0.08/image versus GPT Image-1’s \$0.045/image at ~30 seconds per edit).
Below, we break down the difference between FLUX.1 Kontext Pro and FLUX.1 Kontext Max, then dive into seven concrete workflows that show how to leverage AI-FLOW with FLUX.1 Kontext for everything from simple accessory additions to complex multi-character storytelling.
FLUX.1 Kontext Pro vs. FLUX.1 Kontext Max
FLUX.1 Kontext Pro
- Purpose: Fast, iterative image editing with high-quality outputs and strong prompt adherence.
- Speed: Approximately 8–10 seconds per image.
- Price: \$0.04 per image.
- Strengths: Excellent for local edits (e.g., changing colors, adding small objects, swapping text) and preserving existing scene composition.
- Availability: API only, commercial license via partners (Together AI, ComfyUI, FAL, Replicate, DataCrunch, etc.).
FLUX.1 Kontext Max
- Purpose: Premium model focused on maximum prompt adherence, superior typography handling, and enhanced character consistency—without sacrificing speed.
- Speed: Approximately 10–12 seconds per image.
- Price: \$0.08 per image.
- Strengths: Best for edits that require precise text/typography changes (e.g., signage, labels) or when you need the tightest consistency across multiple edits in a sequence.
- Availability: API only, via the same commercial providers as Pro.
FLUX.1 Kontext Dev (for reference)
- Purpose: Open-weight 12 billion-parameter diffusion transformer for research and customization.
- Speed: ~6–10 seconds per image (estimate).
- Price: TBD (non-commercial use, private beta at Black Forest Labs).
- Strengths: Full access to weights for custom experimentation; lowest latency among the trio.
- Availability: Private beta at Black Forest Labs; public release forthcoming.
All three variants share the same core instruction-based editing architecture: you supply an existing image plus a command like “add sunglasses” or “replace the sky with a sunset,” and FLUX.1 Kontext surgically performs that change while leaving the rest of the image untouched.
All these capabilities can be integrated into more complex AI-FLOW pipelines. AI-FLOW’s drag-and-drop canvas allows you to chain FLUX.1 Kontext nodes with other AI services—OCR, object detection, text generation, and more—creating fully automated, end-to-end image workflows without writing any code.
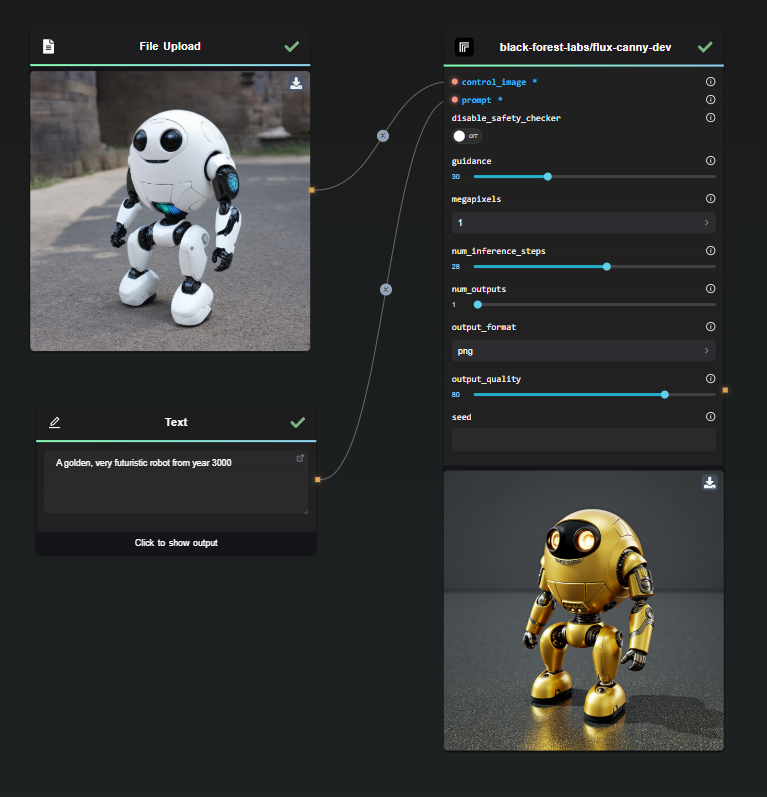
1. 🎨 Add Accessories and Change Background
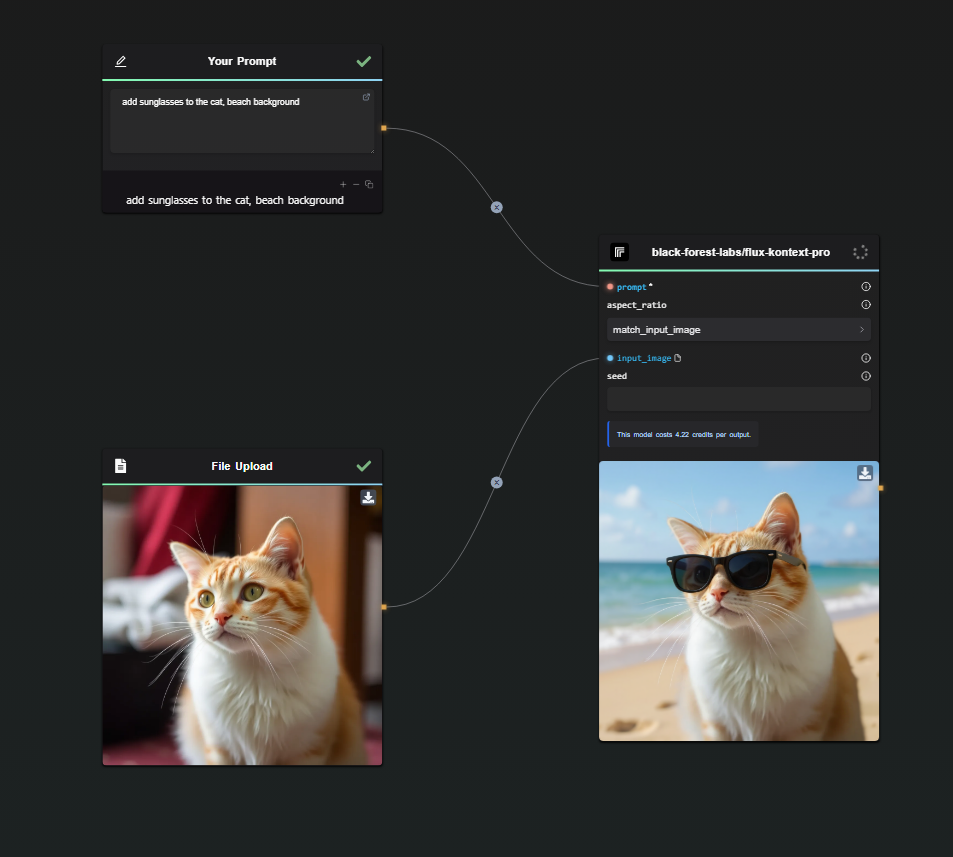
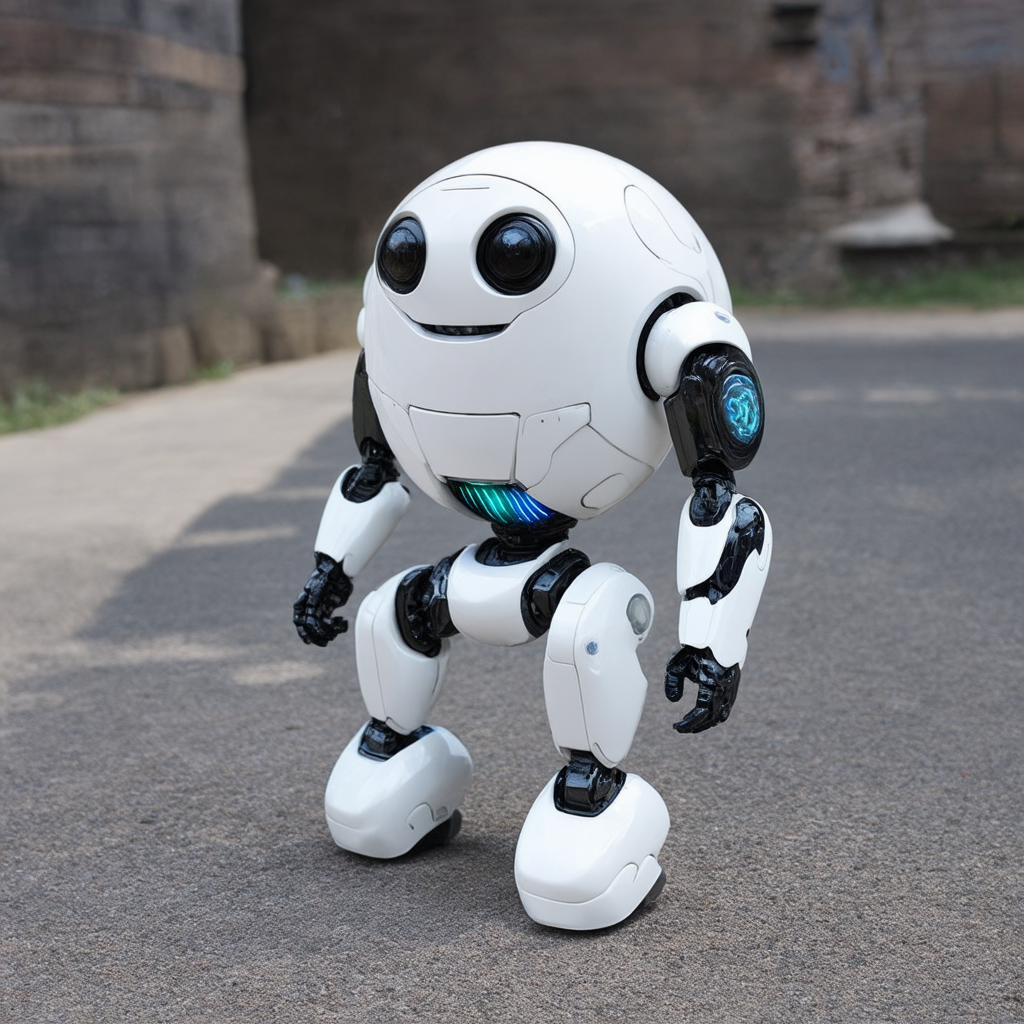
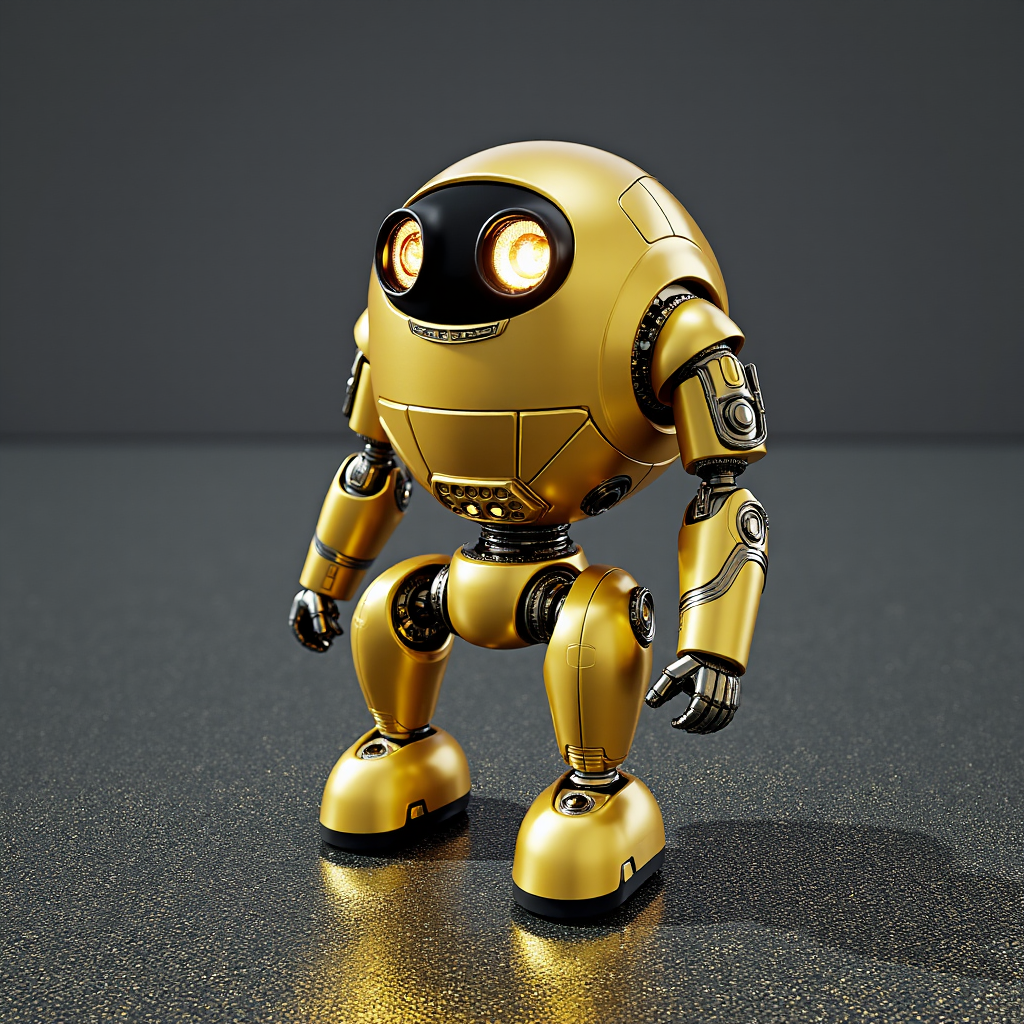
Imagine you have a simple stock photo—let’s say, a cat in a studio shot—and you want a version wearing sunglasses on a beach. With FLUX.1 Kontext, you don’t need to recreate the entire scene from scratch. Instead, you upload your “studio cat” image into AI-FLOW, drop in a FLUX.1 Kontext Pro (or Max) node, and provide two sequential instructions:
“Add sunglasses to the cat. Beach Background.”
- FLUX.1 Kontext identifies the cat, defines a region around its eyes, and seamlessly places appropriately lit, perspectively correct sunglasses.
- Because it only touches that region, the rest of the cat’s fur, lighting, and posture remain intact.
- The model detects the existing studio backdrop and replaces it with a coherent beach setting—sand, water, and sky—while preserving the cat’s outlines, shadows, and the newly-added sunglasses.
- No need for manual masking or layer blending; everything integrate naturally into the new context.
You end up with a “cat in sunglasses on the beach” in under 10 seconds—no Photoshop, no compositing headaches, and no visible seams where one layer meets another.
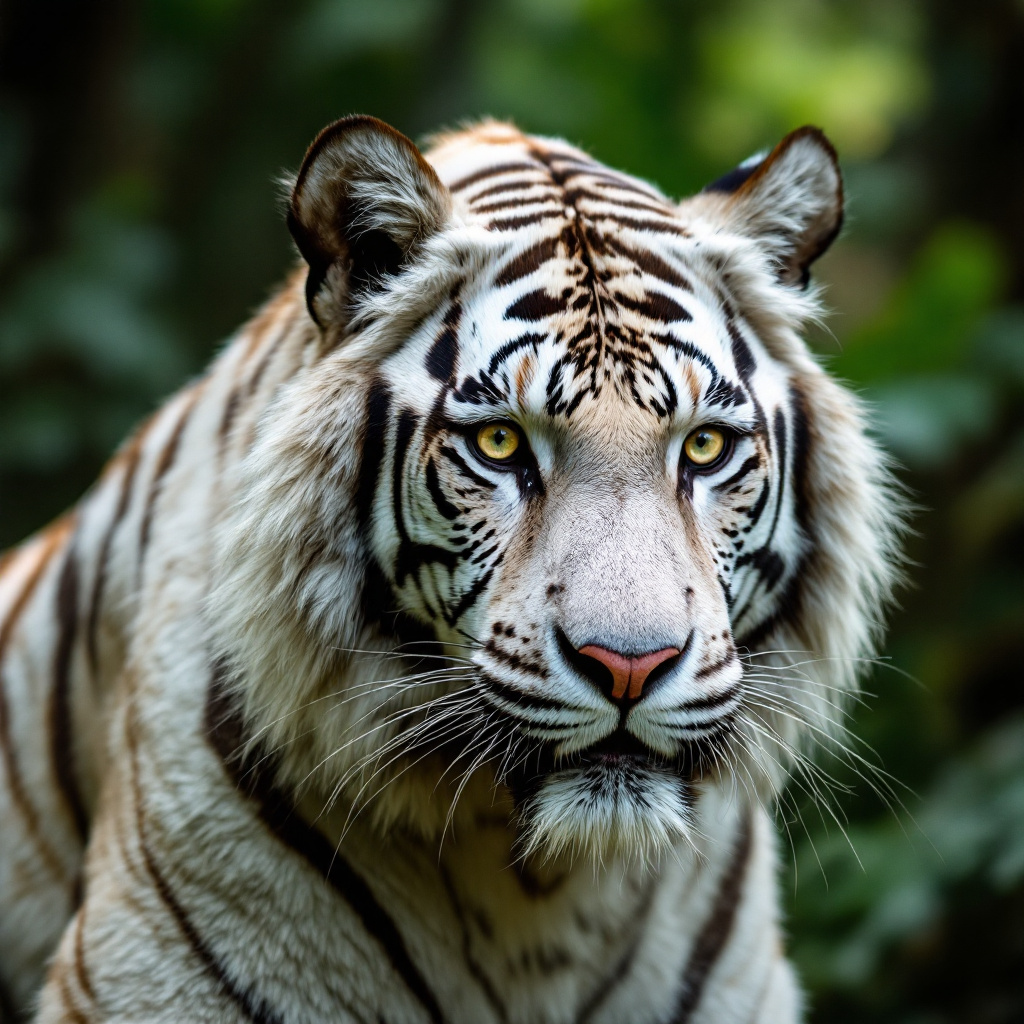
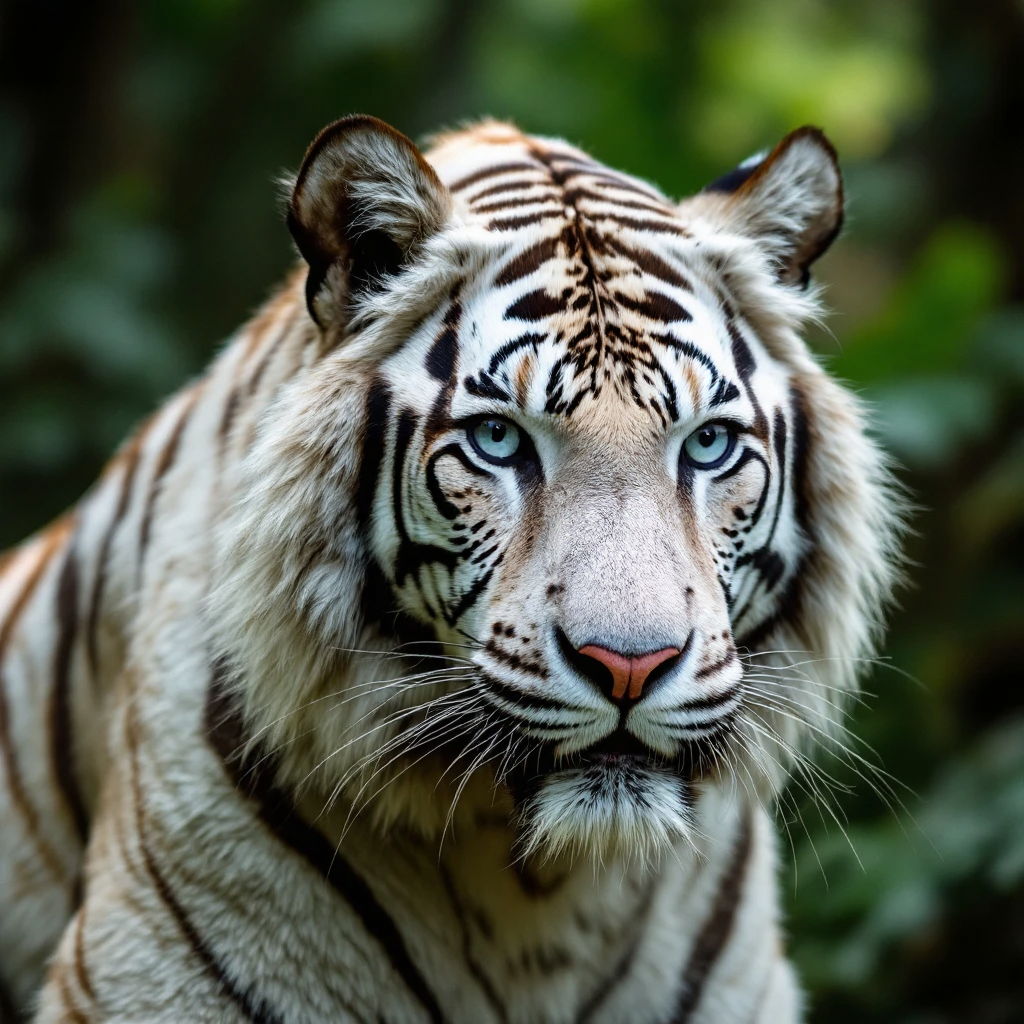
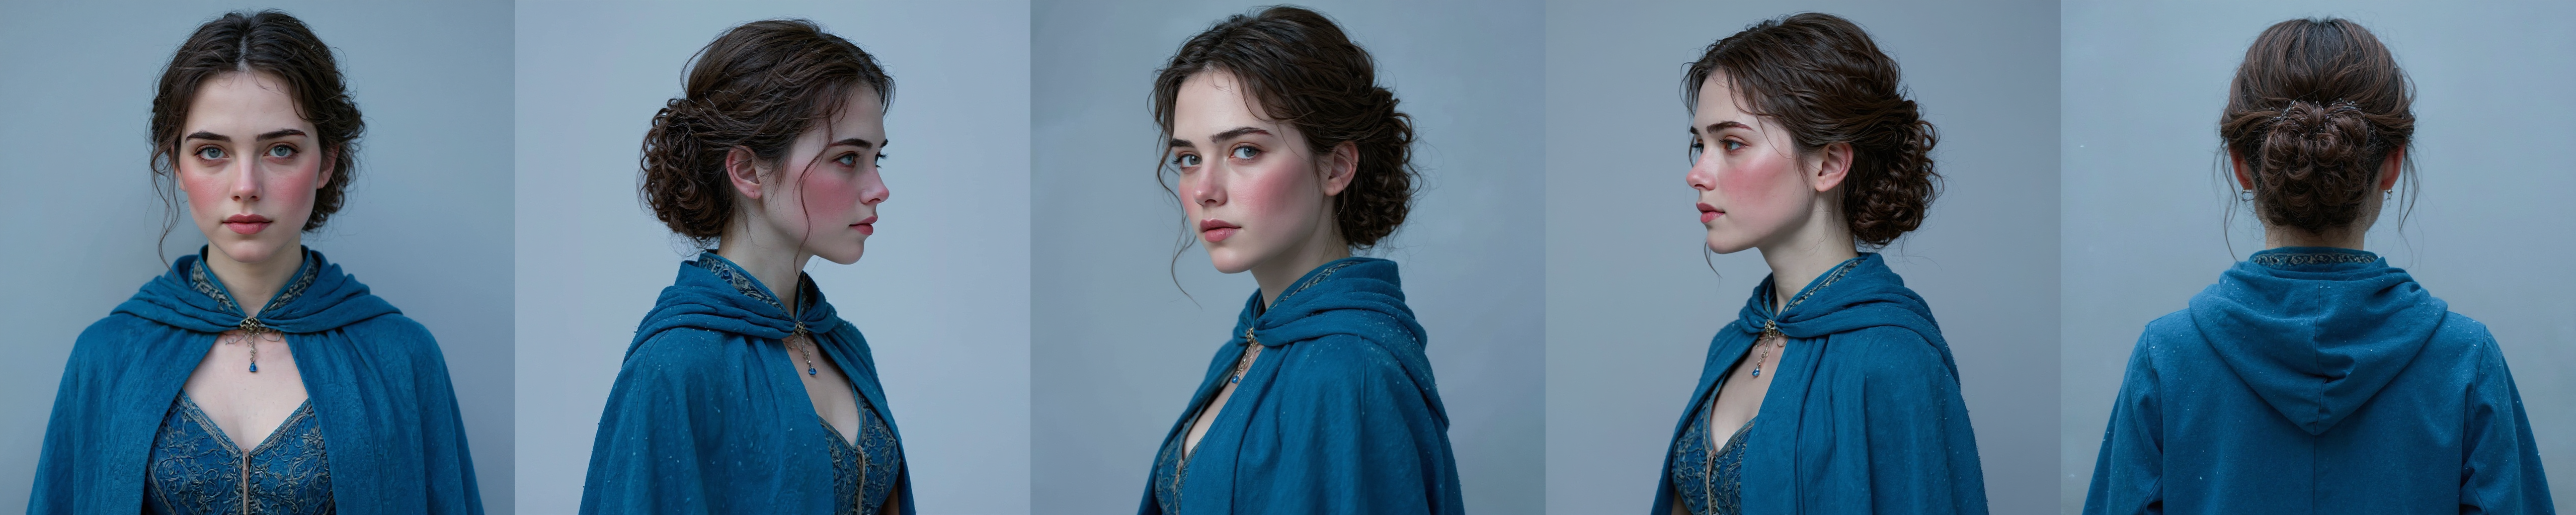
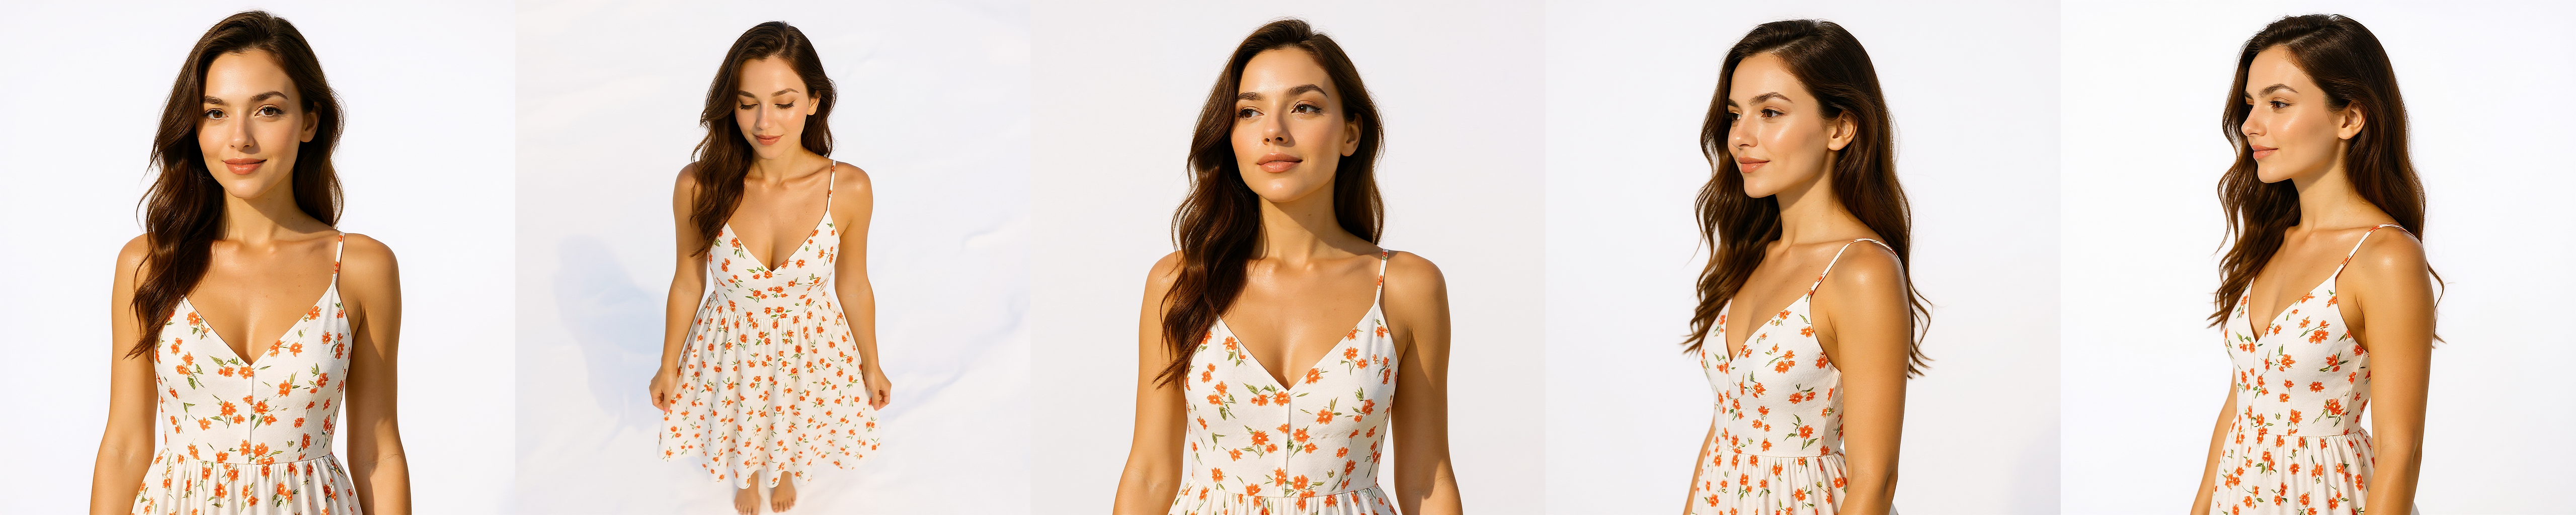
2. ✂️ Viewpoint Rotation
Rotate the camera angle, adjust a face’s orientation, or generate multiple portrait perspectives from a single reference.
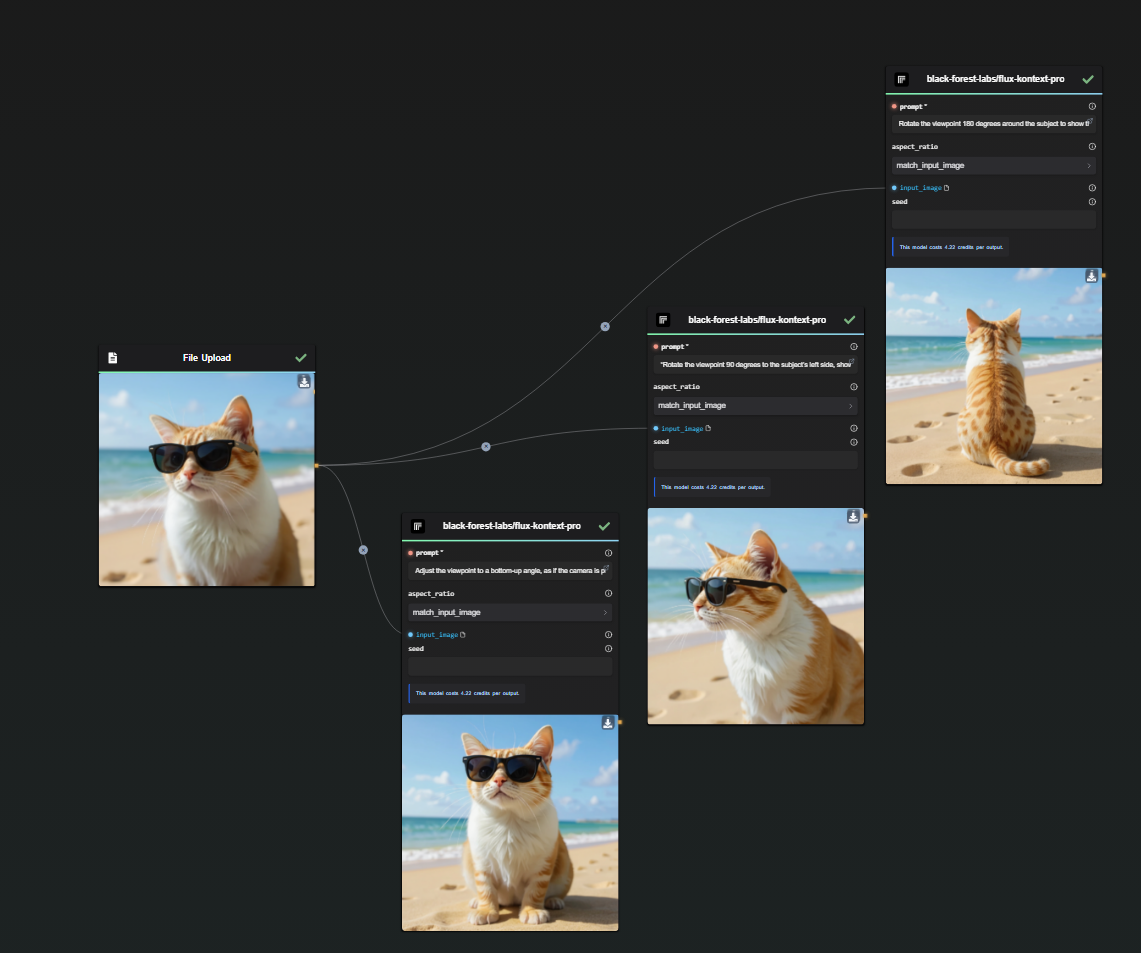
With FLUX.1 Kontext, you can say “rotate the scene 20 degrees to the left” or “tilt the cat’s head upward” and get photorealistic results as if you’d captured the same subject from different angles. Here’s how it works when you need several viewpoints quickly:
Load a single reference image (e.g., a cat on the beach).
Instruction “Rotate the cat’s head 30 degrees to the right.”
Repeat for additional angles.
- “Rotate to a frontal view.”
- “Rotate to show the cat’s left profile.”
- Each edit takes ~10 seconds (depending on Pro vs. Max) and preserves color balance and fur texture.
Below, two examples show five portrait angles of the same AI-generated character—perfect for game assets, 3D model reference sheets, or any project that needs consistent multixposure renders.
3. 🔍 Professional Headshot
Create a polished, LinkedIn-ready headshot from any existing portrait in seconds.

Suppose you have a casual selfie or a candid photo taken at home, but you need a corporate-style headshot with clean background, proper lighting, and business attire. In AI-FLOW, set up:
Input image: A simple snapshot of a person.
Instruction “Convert to professional headshot: white background, even studio lighting, and business attire.”
- FLUX.1 Kontext Max will adjust the shirt and jacket style, ensure consistent shadows, and retouch skin tone for a headshot aesthetic.
- It replaces the environment with a neutral white backdrop, balances highlights/shadows, and upgrades clothing to a crisp suit or blouse.
- The result is a high-resolution headshot that looks like a photo taken by a pro photographer.
No outbound editing tool needed—just a single instruction and your existing photo transforms into a portfolio-ready portrait.
4. 👾 Character Consistency and Storytelling
Bring multiple characters together in a single scene while preserving each person’s unique look.
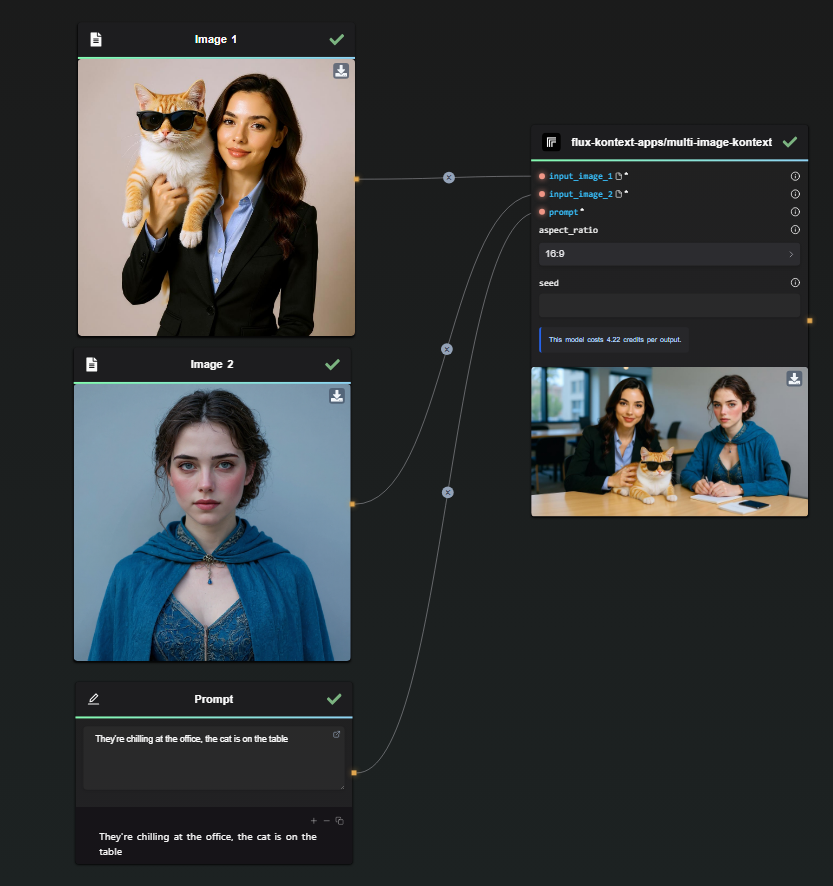
Let’s say you have two AI-generated character images each in different settings. You want a shot of them hanging out in an office with the beach cat from earlier. Using FLUX.1 Kontext Pro (or Max):
Combine all of them into one canvas.
- Kontext infers each subject’s size, lighting, and camera angle.
- It adjusts shadows, scale, and perspective so that both characters and the cat look like they belong in the same scene.
- Character features (face shape, clothing style, hair color) remain identical to each original.
Fine-tune with secondary edits.
- “Have Girl 1 look at Girl 2.”
- Each edit preserves the core identity of each subject while modifying only the requested elements.
NB: Multi-image-Kontext (using more than one input image to inform a single edit) is currently experimental. If you push too many moving parts at once, you might need to break the workflow into smaller steps for guaranteed consistency.
By chaining FLUX.1 Kontext nodes in AI-FLOW, you can expand this simple setup into a full narrative pipeline: character generation → storyboard layout → background creation → final composite—all without leaving the no-code canvas.
5. ⚡ Change Lighting, Hour of the Day
Transform daytime scenes into nighttime, adjust shadows, and simulate different weather or lighting conditions.
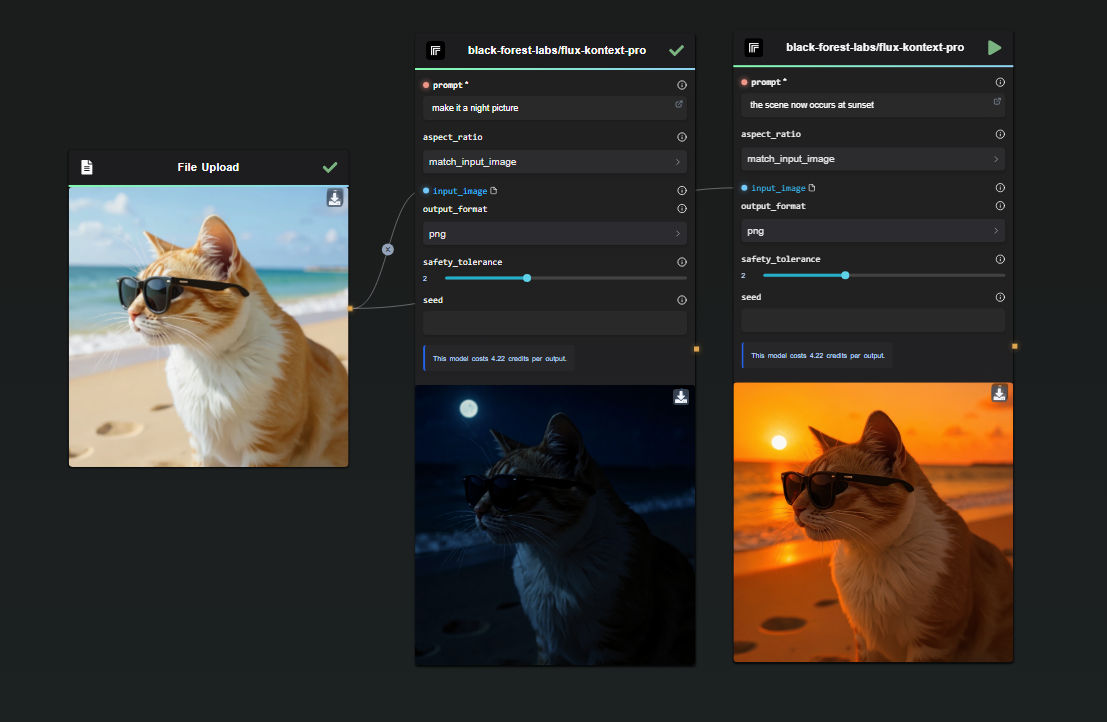
Suppose you captured a sunny beach shot but need a moody nighttime version for a film poster. With FLUX.1 Kontext:
Input image: The “Cat on the beach” daytime photo.
Instruction “Convert to nighttime: dark sky, moonlight reflections, cooler color temperature.”
- Kontext identifies existing sunlight angles and replaces them with moonlit highlights.
- It deepens shadows, shifts blues in water, and adds subtle star specks in the sky—all while keeping the cat’s outline and posture identical.
- Result: a believable night scene ready for further color grading.
Secondary instruction “Now change to sunset: golden light, warm sky, long shadows.”
- Kontext reuses the same input and knows exactly what “sunset” means—deep orange gradients, grazing shadows, and richer saturation around the horizon.
- Everything else remains intact, so the cat never looks like it’s “floating” or mismatched. ﹣ no manual masking, no separate color-grading step.
Beyond day-to-night, you can ask for overcast, midday sun, or moody backlighting. Kontext adapts color profiles and shadow positions automatically.
6. 📚 Typography, Signage, and Product Mockups
Although not pictured above, another powerful workflow is on-the-fly typographic edits—ideal for marketing teams. For example:
Input image: A high-resolution billboard with “SALE” across it.
Instruction “Change ‘SALE’ to ‘NEW ARRIVAL’ in the same font and style.”
- Kontext recognizes the existing font, kerning, and effects, replacing only the text.
- Shadows, bevels, and any text effects (e.g., glow, emboss) are preserved.
Instruction “Move the laptop mockup on the billboard to the left and place a headphone image beside it.”
- Kontext understands “move” as a relocation operation, shifting bounding boxes and recalculating shadows seamlessly.
- It then composites a headphone image from your asset library into the empty space, matching lighting and perspective.
Because FLUX.1 Kontext was trained to handle text as first-class citizens, you avoid typical issues where text becomes distorted or illegible after a standard inpainting pass.
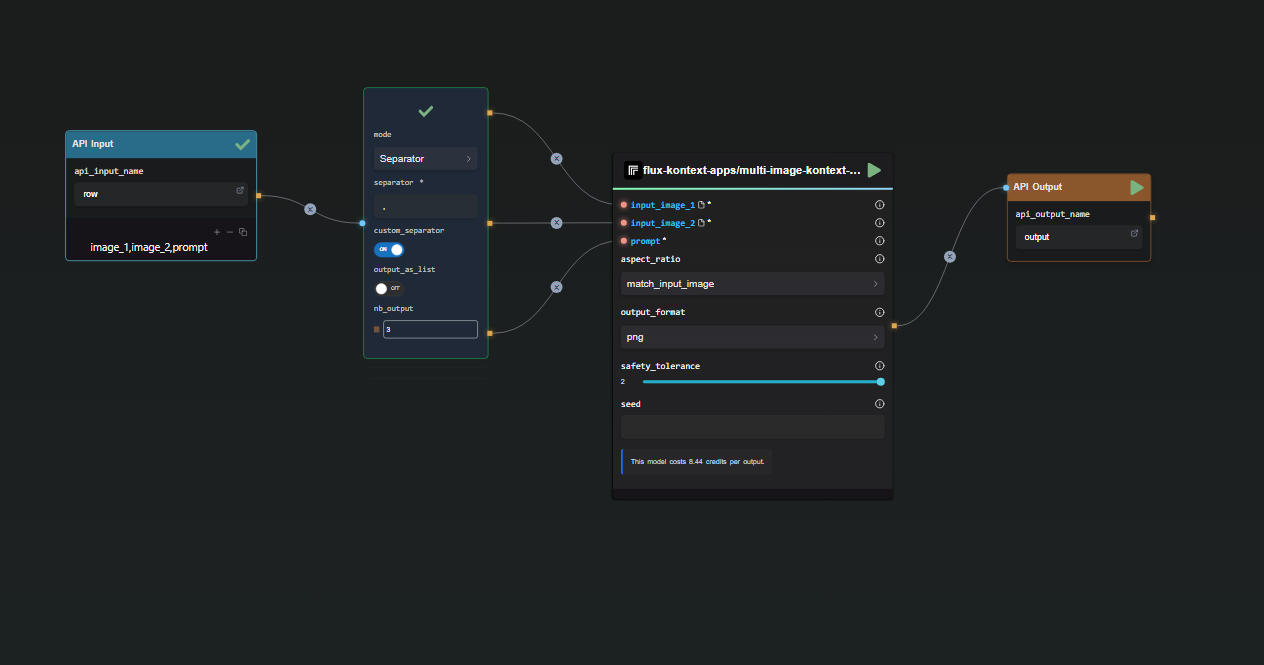
7. 🤖 Batch Generation and Parallel Processing
AI-FLOW’s parallel execution and reusable flows let you turn a single FLUX.1 Kontext pipeline into a bulk asset generator:
- Create a CSV listing 100 products or characters.
- Design a subflow with the Flow API Nodes in AI-FLOW with FLUX.1 Kontext instructions that will process ONE row (e.g., “image_1_url, image_2_url, Insert 1 it into background 2 and add a promotional sticker”).
- Run the flow in parallel select this flow in the Subflow Loop Node, load your file, split it line by line, then connect it to the loop.
- Result: 100+ ready-to-publish images.
Example:
Single-row subflow:
Input a row in the form
image_1_url, image_2_url, Insert 1 into background 2 and add a promotional stickerUse a CSV-Split node to separate by commas into three outputs:
- Base image URL
- Background image URL
- Instruction text
Wire those three outputs into one FLUX.1 Kontext node (Primary Image ← Field 1, Secondary Image/Background ← Field 2, Instruction ← Field 3).
Set the FLUX.1 Kontext node’s edited-image output as the subflow’s result.
Loop over all rows:
- Load your CSV file with a File Loader node, then split it into a list of rows.
- Feed that list into a Subflow Loop node, selecting the subflow you just created.
- The loop invokes FLUX.1 Kontext once per row and returns a list of edited images.
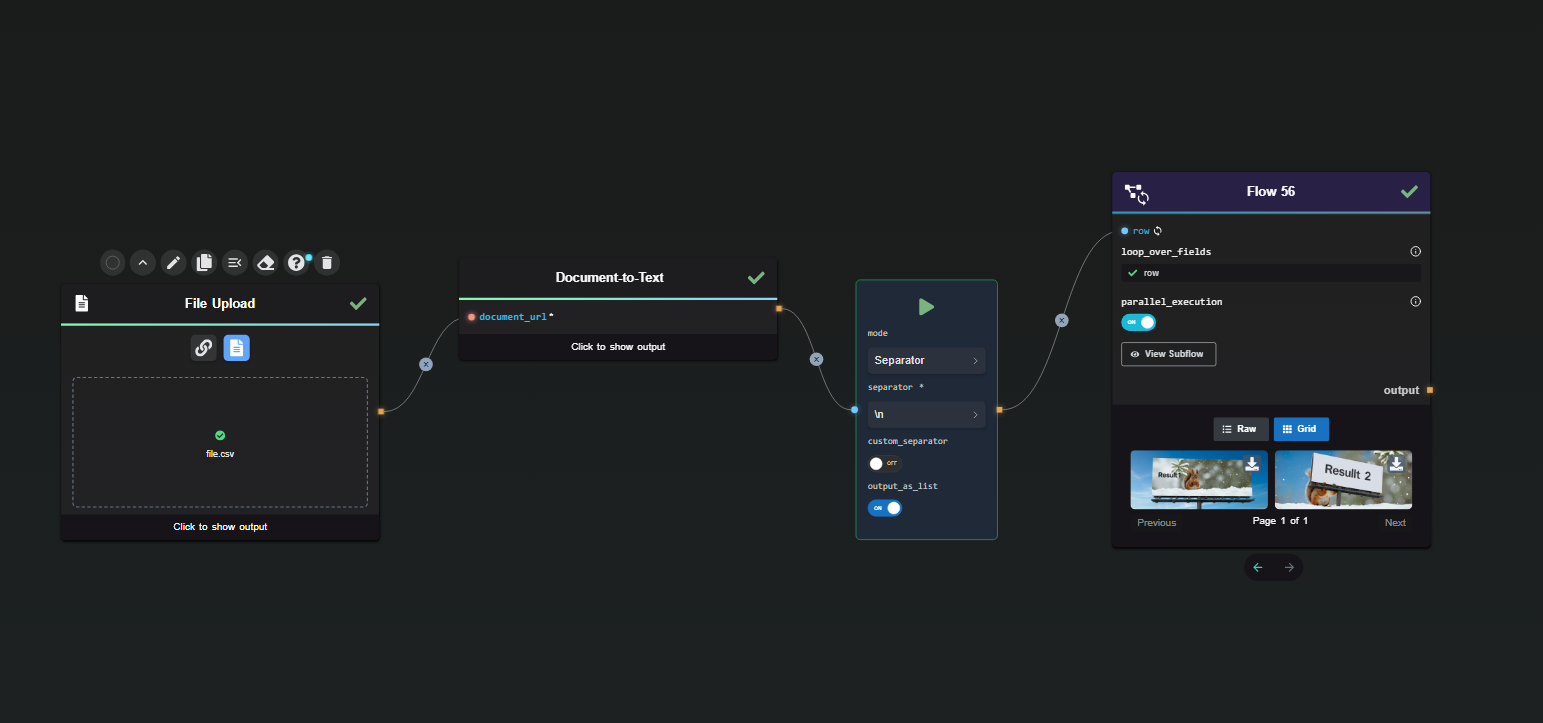
NB: You can also use your Subflow through API
Because FLUX.1 Kontext Pro handles ~6 images per minute (8–10 s each) and AI-FLOW can run many loops in parallel, you can generate hundreds of assets—campaign banners, social-media posts, or game previews—without manual intervention.
🛠️ How AI-FLOW Makes It Easy
The power of FLUX.1 Kontext is accessible to anyone through AI-FLOW’s no-code interface:
- Visual Workflow Builder: Simply drag a FLUX.1 Kontext Pro or Max node onto your canvas, upload or reference your input image, and type your text instructions. AI-FLOW handles orchestration, parallelization, and API credentials.
- Reusable Flows: Save your favorite FLUX.1 Kontext pipelines—whether it’s a character consistency chain or a typography layout—and reuse them across projects without rebuilding from scratch.
- Parallel Processing: Spin up multiple FLUX.1 Kontext executions simultaneously. Generate variations, A/B tests, or entire product catalogs in the time it takes to refresh a webpage.
- Custom API Keys: Manage your FLUX.1 Kontext credentials directly in AI-FLOW, giving you full control over usage, billing, and model version selection (Pro vs. Max).
With AI-FLOW, you get enterprise-grade orchestration without writing a single line of code—letting your creative team focus on ideas, not infrastructure.
✅ Ready to Get Creative?
Whether you’re a designer, storyteller, educator, or filmmaker, FLUX.1 Kontext in AI-FLOW transforms how you generate and edit images. Dive in today and discover new ways to bring your vision to life—instantly, iteratively, and effortlessly.